
I love to create a coordinating set of handmade projects for gift giving. As such, today, I have a simple fun fold card, with a matching envelope and gift box. It’s perfect for birthdays, holidays, or any special occasion! These projects feature some of the NEW products from the Stampin’ Up! September–December Mini Catalog along with a few Online Exclusive items which will launch on September 3, 2025. However, feel free to use any supplies you have on hand.
Fun Fold Card
First let’s talk about how to create the fun fold card. Start with a 4 x 12″ piece of patterned paper. Score along the 12″ side at 2 and 7-1/2.” This will create a simple tri-fold design. The 2″ section is the top of the fun fold card. Create a focal point for the front 2″ flap of the fun fold card. Before adhering the focal point to the card, add a bit of ribbon around the entire card and tie the ends together to create a bow. The bow will keep the card closed. Add the focal point over the ribbon. Be sure to watch the replay of the livestream for some tips on how to do this.


The fun fold card measures 4 x 5-1/2″ when closed. Add a 3-3/4 x 5-1/4″ or 3-1/2 x 5″ piece of white cardstock on the inside of the card and decorate as desired.


Fun folds are an easy way to take your cards from simple to “wow.” And this particular fun fold card can be created with ANY patterned papers you have on hand. I put together these cards to give you a sneak peek of some of the fun NEW Stampin’ Up! products launching on September 3, 2025. However, feel free to use this design to create cards for any occasion.
Envelope
Now let’s talk about how to create a coordinating envelope for your fun fold card. Start with a 6-3/4 x 9-1/4″ piece of the same patterned paper used to create the fun fold card. Score the 9-1/4″ side at 3 and 7-1/4.” Turn the paper so the 6-3/4″ side is as the top. Score 1/2″ in on each side of the patterned paper. Use the template as a guide.

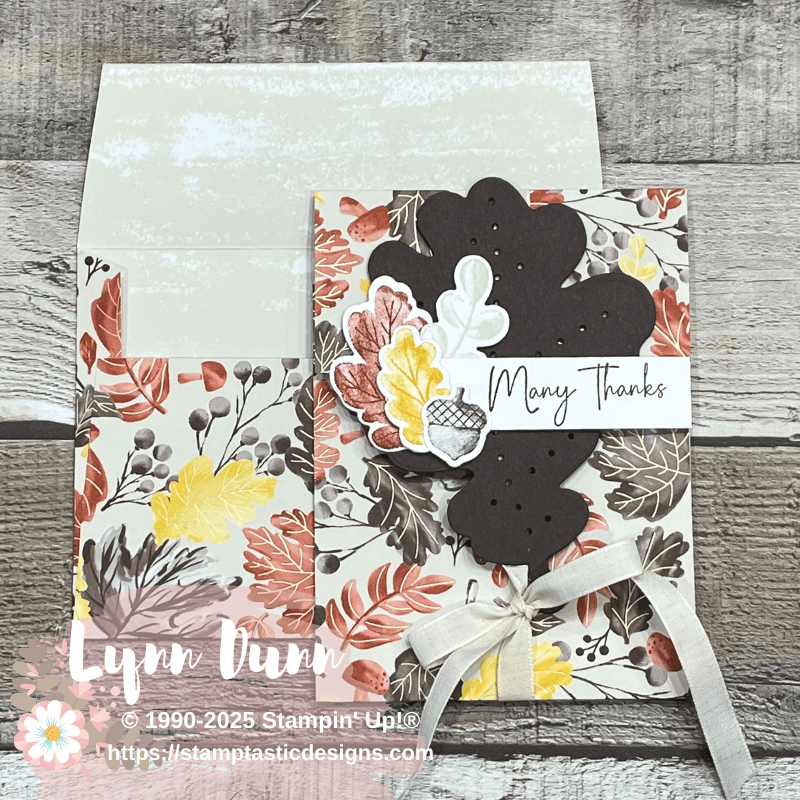
Once you have completed the scoring, you are ready to make a few cuts. The template highlights the areas that need to be cut (the solid lines). Basically, you will be cutting out the 4 corner sections of the patterned paper. The template illustrates how to make diagonal cuts. You can also watch the replay of the livestream to see this process in action.
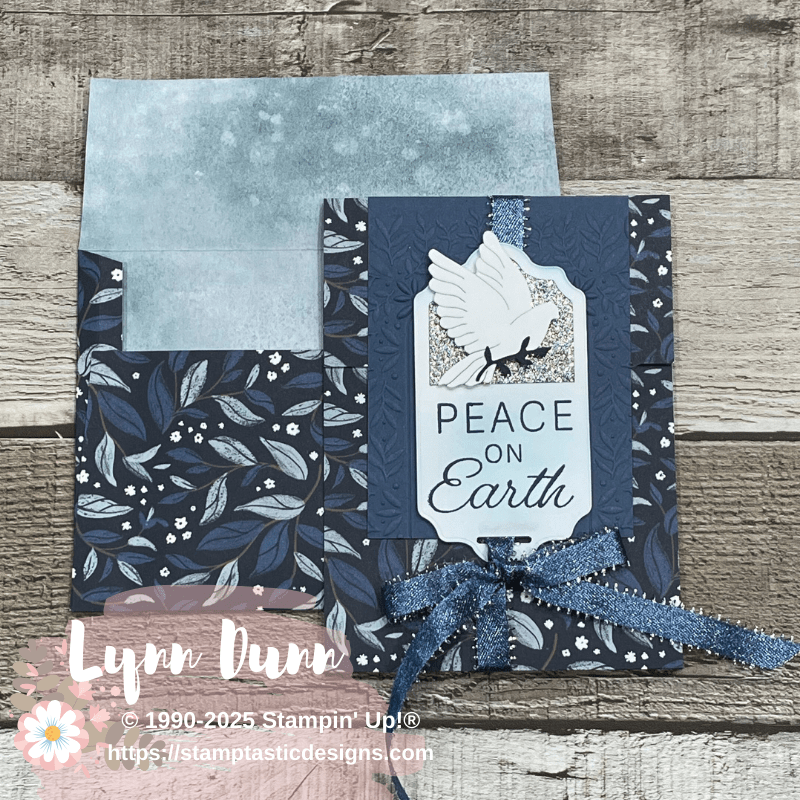

Fold on all the score lines and adhere the larger section, the 3″ section, to each of the 1/2″ flaps on the side. The flap of the envelope is 2.” You can use this envelope template with patterned paper or cardstock.
Gift Box
The last coordinating project idea is this cute little gift box. Start with a 4 x 11″ piece of patterned paper. You can use the same pattern you used to create the card and envelope or choose a coordinating pattern. Score down the 11″ side at 3, 4, 8, and 9.” Turn the paper so the 4″ side is at the top and score in 1″ on each side of the paper. Use the template as a guide to cut the 1″ tabs for the box.


Fold on all the score lines. Secure the tabs between the 3 and 4″ lines to the top section of the box. Secure the tabs between the 8 and 9″ lines to the bottom section of the box. This will create two covers that overlap each other to cover the middle of the box. Just an FYI…one cover is longer than the other. The longer cover overlaps the shorter one. I do recommend watching the livestream to see the assembly process in action.


Once you have created the box, you are ready to decorate it to coordinate with the fun fold card and envelope you already created!
Video Tutorial
Now you know how to create a fun fold card, matching envelope, and coordinating gift box which you can use for any occasion. The best part about these templates is you can use them with any supplies you have on hand.
I hope these projects have inspired you to get creative today! Be sure to watch the replay of the livestream to see the creation of each of these projects in action. Have a fun and creative day! ~ Lynn
Love your projects! Thanks for sharing.
Thanks so much!
Lynn, what a great combination of gift items for Christmas. Thank you so much for sharing this great combination and for the execllent tutorial and measurements!
Thanks so much! Have fun with these gift giving ideas!
WOW Lynn. This is a gorgeous set of gift-giving projects that any recipient would love to receive. Thank you very much for sharing your creativity.
Aloha,
Camille
Thanks so much! There are so many possibilities for using these projects. Have fun with them!